DIY Chocolate Wrappers

While chocolate slabs or candy bars are loved by pretty much the majority of the world population, you'll agree that giving your guests a candy bar off the grocery store shelf is not exactly in good taste (no matter how good that bar might actually taste). However, with a touch of creativity and a dollop of inspiration you can zhoosh up that wrapper in no time, turning an ordinary chocolate bar into a treat that looks so handmade it'll even taste handmade.
Here are some ideas to get your river of chocolate thoughts flowing:
- Stain newspaper with tea to make it look vintage and and old, and use it to wrap your chocolate bar in.
- Print each guest's name on their chocolate bar wrapper so that it doubles as place card.
- Then again, it's your day so have your names and wedding date printed on each wrapper instead, as a memento.
- Print or stick a photo of you and your husband-to-be on the sleeve of the chocolate bar.
- If you're planning a vintage themed wedding, wrap the bars with lace squares or paper doilies.
- For a more textured feel, use wallpaper samples as wrapping.
- Once wrapped, decorate the sleeve of your chocolate bar with dried flower petals, embellishments, ribbon, paper cut-outs or feathers.
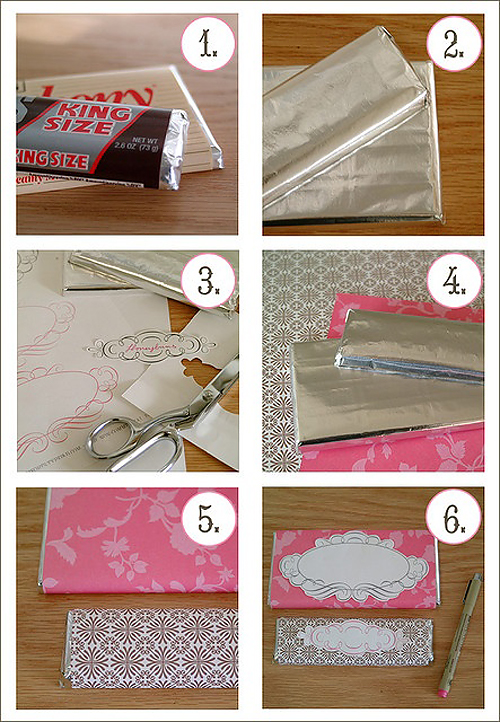
If you're a little confused as to how one would assemble one of these nifty treats, follow this quick and easy step-by-step:
- Buy the kind of chocolate bar that's wrapped in foil with a little paper sleeve around it.
- Basically you want to recreate the paper sleeve using your choice of paper. To get the size, gently slide the sleeve off one of the chocolate bars, peel it open (along the glued edge) and take the measurements.
- Measure out your own paper to the exact size of the original sleeve and cut it out.
- Now comes the tricky part: Wrapping your paper around the foil covered chocolate bar. HINT: Don't try attach the new wrapper in the same fashion as the original – you'll just make life harder for yourself.
- Instead, wrap your paper around the bar, and first stick the one side to the actual foil (on the back of the slab) using sticky tape. This way you'll find that it's much easier to pull the sleeve tight and stick down the other side with glue.
- And there you have it! Decorate your slab with your desired embellishments, and voilà!
For more ideas on DIY Candy or Chocolate Wrappers or to check out the original photos displayed above and their credits, make sure to check out our Wedding Chocolate & Candy Wrappers!