Make Your Own Paper
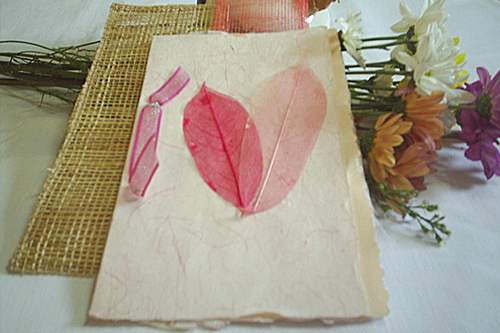
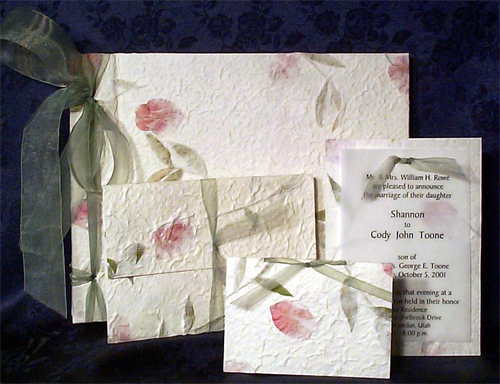
Making your own paper is not only greenminded of you, but also ensures that your wedding stationery will be exactly what you want for your special day. Bear in mind that this paper is ideal for a background (i.e. it is best to stick another piece of paper on top of it than to write directly on it).
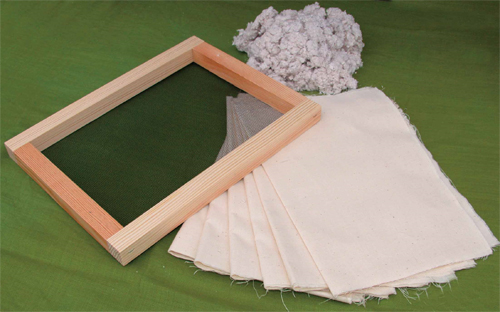
For the mould and frame for an A4 piece of paper, you will need:
- Four pieces of pine, each measuring 330mm x 2mm0 x 20mm for the sides
- Four pieces of pine, each measuring 210mm x 20mm x 20mm for the top and bottom
- Waterproof wood glue
- Curtain netting
- Eight L-shaped frame braces with screws
- An electric screwdriver
- A staple gun
- A pair of scissors
Source: Myriad
Method:
- Make the mould section by forming a rectangle with two 330mm pieces and two 210mm pieces. The two short pieces should fit inside the two long pieces. Stick these pieces together with the wood glue.
- Screw an L-shaped frame brace in each corner to strengthen the frame.
- Wipe any excess glue off with a damp cloth.
- Cut a piece of curtain netting slightly bigger than the mould and staple it onto the top of the frame.
- Place the mould in position on the netting, with the frame braces facing down. Pull the netting as tight as you can, folding it over the mould.
- Staple it to the top of the mould using the staple gun, ensuring that there are no folds in the netting before you staple it.
- Cut any of the excess netting away.
- Repeat this process for the frame, excluding the netting.
To make the paper, you will need:
- The mould and frame
- Plain recycled paper (white or brown)
- Rubber linoleum that has been cut to fit into the inside of the frame
- Pieces of white felt (larger than the frame)
- A large plastic basin, big enough to accommodate your mould’s frame with ease
- Plenty of paper towels
- A handheld blender
Source: Amazing Podgirl
Method:
- Cut your recycled paper into small pieces and soak this in a basin of water for at least 24 hours.
- Once it has soaked, use the hand blender to turn it into a pulp. The more you blend it, the finer your paper will be. Add more water if you want thinner, finer paper.
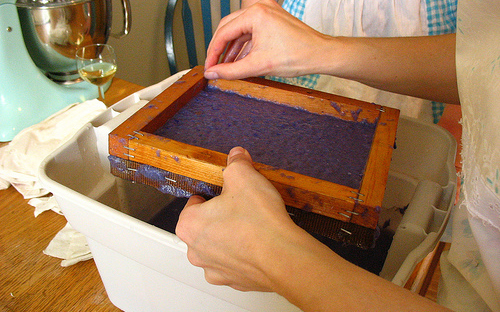
- Place the frame next to the basin with the braces facing up. The netting must face up and the braces of the mould down.
- Stir the pulp in the basin very well.
- Grip the frame and the mould firmly together and insert them into the basin with a rolling movement (that is, not straight down).
- Lift the mould and frame out of the basin, shaking it gently backwards and forwards to ensure that the layer of pulp inside the frame is evenly spread and of the right thickness for your paper.
- When you are happy with the thickness, hold the frame over the basin, allowing the water to drain out.
- Balance the mould on the edge of the basin and put the rubber linoleum directly onto the pulp inside the frame. Press down on the linoleum, squashing more excess water out.
- Very gently, remove the frame from the mould and put it to one side.
- Turn the mould over onto a piece of the white felt, leaving the linoleum at the bottom.
- Use the paper towel to absorb even more water from the pulp.
- Lift the mould off the pulp very carefully.
- Turn the linoleum and pulp over onto another piece of white felt.
- Carefully roll the linoleum off the pulp.
- Leave the pulpy paper on the felt until it is completely dry before you touch or move it.
You may choose to add dried rose petals, lavender or leaves to the pulp so that these form part of your recycled paper. In addition, a few drops of food colouring will give your paper a beautiful shade. Ensure that it is well mixed in.
Source: The Petal Press